Table Of Contents
- Welcome to the Free Print-on-Demand Course
- So, how does print-on-demand work?
- Here’s why I love print-on-demand
- How Can Starters Market Their Print-on-Demand Products?
- Now, let’s dive into the process of creating designs with Printful and setting up your website for free.
- The process of setting up and customizing your “keep pressing” shirt.
- Next, let’s move on to shipping and pickup options.
- Now, let’s delete the sample products that were included in the initial setup.

Click on the Table of Contents to navigate.
Welcome to the Free Print-on-Demand Course

Welcome to this free print-on-demand course! I am committed to providing 100% free education, while others charge thousands of dollars for similar information.

If you’ve always wanted to start your clothing brand or sell products online without holding any inventory, this will be the perfect free course for you. By the end of this article, you’ll be ready to launch your online store with print-on-demand. So, let’s dive right into this free print-on-demand course.
So, how does print-on-demand work?
With print-on-demand, you design a product and add it to your online store. I will show you how to do this today. Then, you market the product, and when a customer places an order on your website, the print-on-demand company will print and ship the product directly to your customer. This means you don’t have to worry about shipping or creating the products yourself. Your main task is to create the designs and products. Once a customer places an order, the print-on-demand company takes care of the rest, and you keep the profits.
Here’s why I love print-on-demand
It allows you to start with zero dollars and has no inventory commitment. Unlike drop shipping, it is a less saturated market. The possibilities are endless, as you can create numerous designs, and I will show you a print-on-demand supplier with fast shipping, eliminating the need to search for products to sell, like you would in dropshipping.
In this free course, you will learn what print-on-demand is, how to design your clothing, how to create a logo for your brand, how to build your print-on-demand store for free (zero dollars monthly), how to market and generate sales, and lastly, how to fulfil orders and connect with the print-on-demand supplier.
How Can Starters Market Their Print-on-Demand Products?
Most people who teach print-on-demand usually recommend using Shopify and buying ads. However, I believe these steps are unnecessary, especially for beginners. As a beginner, it’s important to just get started. When I began my entrepreneurship journey, I didn’t have any money. That’s exactly how I will teach in this article.
Now, let’s take a look at what your customer will receive. I ordered a whole box of samples to show you what everything looks like. When you as a customer open the box, you’ll notice that it comes from a random address, and they even include your company name on the label. This customization makes it look like the package is from your company, not from the print-on-demand supplier. The package includes a packing slip, but don’t worry, the original prices are not listed on it. It only states the items ordered and your company name, along with a random address. Let’s now explain the quality of the clothes.
They package all the items nicely in individual bags. The t-shirt design is printed nicely, even though you used a picture taken with your iPhone. The hoodie design is also printed well, and the hoodie itself is of high quality, with a thick material. The embroidered hoodie looks great too, with an additional text sometimes on the sleeve. This little detail makes it unique. By adding positive quotes or something personal, you can create a more special design. Overall, the print-on-demand items may exceed the customers’ expectations in terms of quality.
Now, let’s dive into the process of creating designs with Printful and setting up your website for free.
To begin, go to printful.com, which is my favourite print-on-demand platform. Sign up for an account using the link provided in the description, and then access your Printful dashboard. From there, click on “Product Templates” to upload your image.
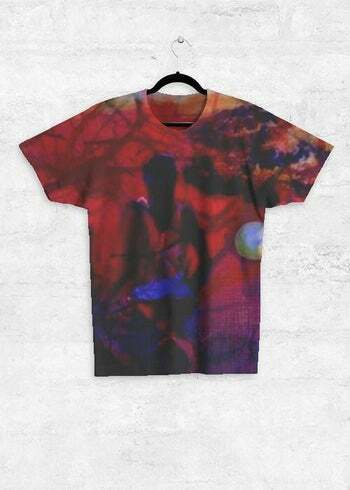
The process of setting up and customizing your “keep pressing” shirt.
We will also provide some tips and inspiration along the way. Let’s get started!
First, let’s remove the unnecessary pictures and upload the image that we saved from the Printful site. Once the image is uploaded, it’s important to create a compelling description for your shirt. You can use the following template as a starting point: “This shirt is designed to inspire and empower. With its powerful message of “keep pressing,’ it serves as a reminder to embrace faith and overcome any challenges that come your way.”
Now, let’s move on to the options section. Here, you can add different sizes and colours to your shirt. Click on the “Options” tab and select “Size.” If you want to add additional sizes, such as extra-large, simply input the details in the appropriate fields. If needed, you can adjust the price accordingly. Keep in mind that sometimes larger sizes may incur additional costs from Printful.

To add colour options, click on “Add New Option” and select “Color.” Then, add the desired colour options, such as pink, blue, and so on. This allows your customers to choose their preferred colour when ordering.
Next, let’s move on to shipping and pickup options.
If you’re using Ecwid as your website host, you can choose to offer free shipping or set a fixed rate per item. For example, a fair price range for shipping could be between $5.75 and $6, depending on your profit margins. Adjust this value accordingly to ensure you cover the shipping costs.
Additionally, Ecwid offers features like CEO rankings and related product sections. While these can boost sales, keep in mind that your primary focus should be marketing your products on social media platforms rather than relying solely on SEO. Enabling the related product section can encourage customers to explore more of your offerings.
To make the purchasing process seamless, utilize the “Buy Now” button. You can embed it easily and enable customers to purchase the product directly without going through the cart system. Don’t forget to save your progress by clicking the save button or using the shortcut Ctrl+S.
Now, let’s delete the sample products that were included in the initial setup.
Although they provided a helpful reference point, you no longer need them. Simply remove them from your store.
Moving on, let’s set up the payment options. Within Ecwid, you can choose from various payment gateways. Stripe and PayPal are commonly used options. Stripe allows customers to pay with their credit cards, while PayPal provides an alternative payment method. Select the payment options that suit your preferences and your customers’ needs.
Once you’ve completed the setup process, it’s time to preview your store. Your store’s appearance will be further enhanced when you have multiple listings. Customize your storefront by removing unnecessary elements and replacing them with your email address and social media links. This helps establish credibility and legitimacy.
With your store now set up and products ready, you might be wondering what to do once you receive an order. In Ecwid, you can automate the order process by integrating with Printful. Install the Printful app in your Ecwid store and connect it to your Printful account. This allows you to manage orders seamlessly from one platform.
To process orders manually, click on “New Order” and then select “Create Your Order.” Fill in the required information, including the customer’s shipping details and the chosen product options (colour, size, etc.). Keep track of the estimated delivery date and the price breakdown. Aim to make a profit of at least $10 per sale by factoring in the product cost, shipping expenses, and others.